Lesson video
Narration is AI-generated. Video chapters, transcript and sources
Transcript
Transcript
UNIT-01 asks
Last time we built the scene, and the robot still can't grasp. So who does it actually learn from? This episode, we take demonstrations from human teleoperation and train a policy that can grasp. Every step uses the LeRobot library, and you can start without touching a real robot.
From demos to policy
First, the goal. We give the arm two things: the image it sees, and its joint angles right now. Concretely: six position values, five arm joints and one gripper. The action gives their next target positions. What it has to output is how to move next. The easiest way isn't writing rules. It's showing it how people do it. That's imitation learning: human demonstrations are the teacher, and the policy learns by copying. Why not write rules? For one cup, position, angle, lighting vary endlessly. You could never write all the rules. Where do demonstrations come from? A person holds a second arm and steers. The robot moves along, and images and actions are recorded together. While recording, images and actions line up exactly. Half a beat off, and the policy learns it wrong. The LeRobot library stores data from all kinds of robots in one format. So you can train directly on other people's data. We use a public dataset from the LeRobot community. It holds pick-and-place demos recorded on an S O series arm. Inside are fifty real-robot demonstrations, with two cameras. One looks down for the big picture, one from the side for the details. Each one is synchronized images plus actions. Data quality matters. The cleaner and more varied the demos, the steadier the policy learns. Messy demos only teach it bad habits.
ACT: a short chunk at a time
The model we train is called ACT, Action Chunking with Transformers. In LeRobot, it's the recommended starter policy. The key is in the name: action chunking. It doesn't predict one step at a time. It outputs a short chunk of future actions. How long a chunk is, you can tune. Too short, and it's back to step-by-step. Too long, and it can't keep up with change. Why chunk? Predicting step by step, small errors snowball. And the motion starts to shake. Inside, a vision network reads the images. A transformer blends images and joint angles, then puts out actions. The vision network recognizes the scene, the transformer handles timing. Together, the motion comes out smooth. It does something complex, but it isn't big. The documentation says it has only about eighty million parameters. Small, but capable. The documentation says it often reaches a high success rate with just fifty demonstrations. But it has a weak spot. It learned only this one grasping task. Talk to it, and it won't understand. So no rules needed! With about fifty demos, it often reaches a high success rate.
Training it yourself
Open this episode's notebook. Step one: install the library called LeRobot, then check that the GPU works. You don't download the data by hand. The loader retrieves it from the Hub and caches it locally. We inspect samples before starting training. Step two, load the dataset. See how big the images are, and how many dimensions the action has. Step three, one command starts training. Tell it: use the ACT policy, here's the data, compute on the GPU. Compute where? One word: cuda, meaning the GPU. Without a GPU it falls back to the CPU, but much slower. Once training starts, it repeats one thing. Take a random batch from the data, measure how far off it is, then nudge the parameters. Start with a small batch size, say, eight. If there's memory left, go higher. Don't blow the GPU memory right away. The first time, run a small config to check the whole pipeline works. Once it's fine, scale up. A small config finishes in minutes. No errors, and the loss is moving? Then scale up with confidence. How long does real training take? The documentation says one hundred thousand steps on a single GPU take a few hours. Watch one number in training: the loss. If it steadily goes down, the policy is learning. The log keeps printing loss and speed. You can also open a dashboard and watch the curves live. Training can be paused and resumed. A saved checkpoint can be loaded back any time to continue. When training ends, you get a checkpoint. That's the trained policy, ready to load any time. Want to share it? Add one more argument, and the policy is pushed to the Hub.
Evaluation and limits
One thing to be clear about. This data was recorded on a real robot, and there's no matching simulation. Evaluating on a real robot is expensive and slow. So many people practice in simulation first, then move to the real robot. So to really evaluate it, you have to run the policy back on the real robot, and see if it really picks things up. On the real robot, it's wired to cameras and motors. It grasps again and again in front of you, and only then do you know if it works. Real robots bring a pile of hassles: calibration, latency, wear. Simulation lets you sidestep them at first, but on the real robot you still have to face each one. Don't evaluate just once. Run it dozens of times and take the average. One success might just be luck. No real robot? That's fine too: switch to a task with a simulator. Use the eval command to score it on a standard benchmark. And one more: don't rush to trust a success rate. Ask which objects, what lighting, and how many tries it was measured with. In the end, generalization is still hard. Change the cup, change the light, and the success rate may drop. So don't report just one number. Write down the test conditions. Only then can others reproduce it. Let's recap, three points. One, imitation learning: watch demonstrations, don't write rules. Two, ACT outputs a short chunk of actions at once; the model is small and trains fast. Three, real-robot data needs real-robot evaluation, and generalization is still hard. So robots aren't programmed. They're taught by demonstration! So how do you train it to understand a sentence before it acts? See you next time!
Evidence and sources
Practice and self-check
- Interactive quiz5 questions, explained as you answer
- One-page summaryprintable; opens in a new tab
- Download the notebookszip in Chinese, English and Japanese; run in Jupyter or upload to Colab
The quiz is public and explains each answer as you go; answers to the guide's exercises are for signed-in members.
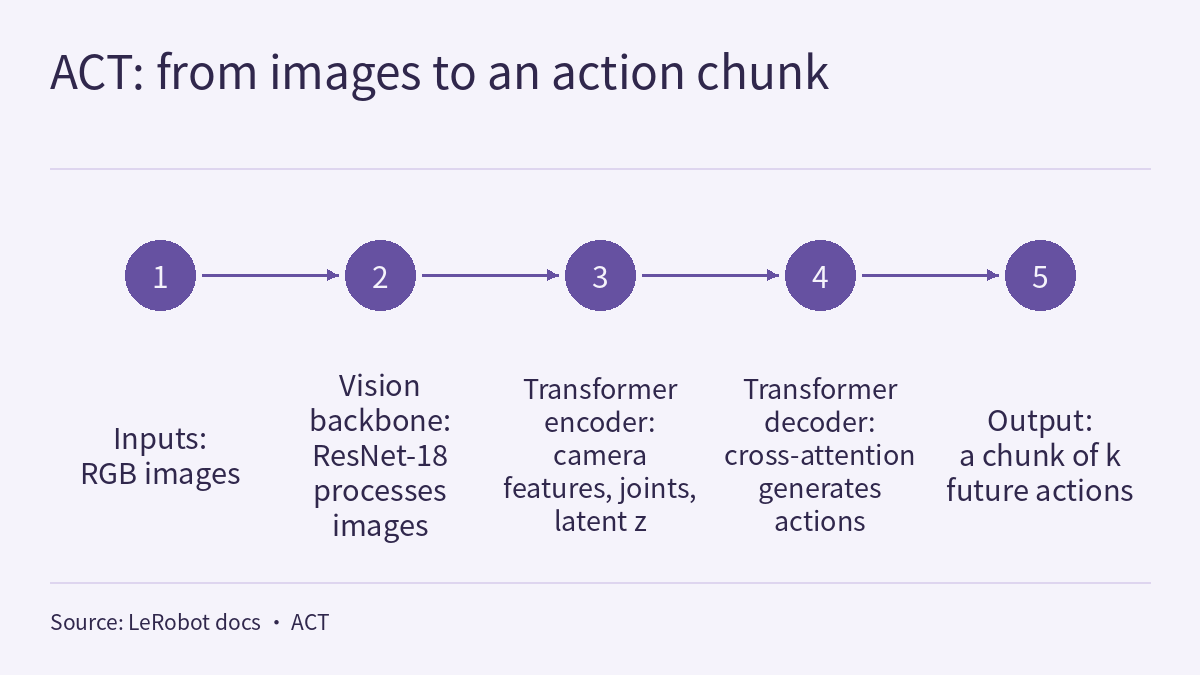
The episode 2.2 video uses LeRobot to go once through turning demonstrations into a policy. The input is the image the arm sees and its joint angles right now; the output is the positions it should reach next. The model is ACT (Action Chunking with Transformers), which predicts a short chunk of future actions at once. The data is svla_so101_pickplace, a public dataset from the LeRobot community holding 50 real-robot pick-and-place demonstrations on an SO-series arm. Training is one command; evaluation means going back to the real robot. The episode’s number cards come from two public sources: the dataset’s meta/info.json and the ACT page of the LeRobot documentation (about 80 million parameters, often a high success rate with just 50 demonstrations, about a few hours for 100k steps on a single GPU). This page is the episode’s reading and exercises. Rather than repeat the transcript, it reads the two sources side by side: which ACT input or output each metadata field corresponds to, what each flag of the documented training command does and leaves unsaid, and where the evaluation example and the training data disagree on robot type and cameras. One rule runs through the page: a command or a number holds only for the data and the documentation version that state it, so match every item before you run anything.
The video, transcript and sources for this lesson are at the top of this page; the season plan is in the course outline. The previous lesson, Physical AI Lab 2.1: Building a Grasping Scene in MuJoCo — Working Out the Mass, Units, Timestep and Collision Rules the XML Leaves Unwritten, ended by asking: now that the scene exists, how does the robot learn to act from data? This lesson picks up there. The number of episodes, frames and total duration of this dataset were already worked out from the same metadata in Physical AI Lab 1.5: Where Does Data Come From? Working Out Demonstration Time from SO-101 Metadata, Then Separating the Units and Action Spaces of Three Sources. The experimental conditions behind the ACT paper’s “about 10 minutes of demonstrations, 80–90% success” were covered in Physical AI Lab 1.6: Imitation Learning — Working Out How an Error Rolls Out of the Demonstrations’ Coverage, Then Putting the ACT, Diffusion Policy and Data Scaling Numbers Back in Their Own Conditions. Stating conditions, pairs and trial counts behind a success rate was practised in Physical AI Lab 1.8: Evaluation — Splitting a “Net Gain of 2” into a Paired Table, Then Checking the Failure Labels and Random Seeds. This lesson does not repeat them; it covers only the LeRobot documentation page the video newly relies on, and what has to be checked between it and the metadata.
The public quiz’s 5 questions come with full explanations. Signed-in readers can work through three exercises: map the metadata fields to ACT’s inputs and outputs, work out how long several chunk lengths last, and write a training command for a fictional dataset; use fictional timings to keep a training budget, separating steps, batch size and samples; and review a fictional real-robot evaluation plan before it runs, then rewrite its report. Each comes with a step-by-step solution, common mistakes and a 20-point rubric.
1. What the two sources say
The dataset metadata. meta/info.json is a JSON file. The table lists the fields and values it records; it is a summary of metadata facts, not quoted sentences:
| Field | Value | Reading |
|---|---|---|
| robot_type | so100_follower | The robot type field; so101 appears only in the dataset name, which is why the video says only “an SO-series arm” |
| total_episodes | 50 | 50 demonstrations |
| total_frames | 11939 | All frames |
| total_tasks | 1 | A single task |
| fps | 30 | 30 frames per second; actions and state are also recorded at 30 fps |
| splits | train: 0:50 | All 50 episodes are in train; the metadata holds out no test episodes |
| observation.images.up, observation.images.side | video, shape [480, 640, 3] (height, width, channels), av1 codec | Two cameras |
| observation.state | float32, 6 dimensions | shoulder_pan.pos, shoulder_lift.pos, elbow_flex.pos, wrist_flex.pos, wrist_roll.pos, gripper.pos |
| action | float32, 6 dimensions | Same names as observation.state |
| timestamp, frame_index, episode_index, index, task_index | 1 dimension each | Time and indices |
| chunks_size | 1000 | See section 2 |
The episode’s two number cards correspond to two passages in the metadata, each excerpted independently:
"total_episodes": 50
"gripper.pos"
The second is the last entry in the name lists of action and observation.state: the first five entries are arm joints and the last is the gripper, which together make the video’s “six position values”.
The ACT page of the LeRobot documentation. The three sentences behind the episode’s three number cards, each excerpted independently:
Lightweight : Only ~80M parameters, making it efficient and easy to work with
Data Efficient : Often achieves high success rates with just 50 demonstrations
Expect a few hours for 100k training steps on a single GPU
The page also says that ACT is a lightweight and efficient policy for imitation learning, especially well suited to fine-grained manipulation; that because of its fast training, low computational requirements and strong performance it is the first model recommended when starting out with LeRobot; and that it comes from the paper Learning Fine-Grained Bimanual Manipulation with Low-Cost Hardware by Zhao et al. Its training tips add two more points: ACT’s default hyperparameters work well for most tasks, and batch size should start at 8 and be adjusted to the GPU’s memory.
Three things to keep in mind when reading these sources:
- Both are level O, but of different kinds. The metadata is the dataset file’s own record; the documentation is the LeRobot team describing its own model. This site has not run the training or the evaluation and has not checked any of these items.
- The two 50s are not the same thing. The dataset has 50 demonstrations; the documentation says ACT often reaches a high success rate with just 50 demonstrations. The latter is a general statement in the documentation that names no task, robot or evaluation conditions; it is not a prediction for this dataset, and the episode’s number card notes that it was not measured in the video. The ACT paper has its own conditions for “10 minutes or 50 demonstrations”; see 1.6.
- “A few hours” gives no GPU model, batch size or task. It is a time reference for 100k steps, not a number of steps training must reach, nor a condition for a valid evaluation.
Sign in to keep reading: the rest of this lesson, its self-check questions and the answers.
Limitations
- meta/info.json was read from the dataset’s main branch, fetched on 2026-10-14; the main branch may change. Lesson 1.5 read the same metadata at a pinned commit, and the episode count, frame count, frame rate and number of cameras it reports match this lesson. The metadata is level O; this lesson did not download or check the data files or videos, and the metadata does not describe the recording method, demonstration quality or any hardware detail beyond the robot_type field.
- The ACT page of the LeRobot documentation is level O vendor documentation, read at an unversioned address and fetched on 2026-10-14; the page offers version switching including main, v0.6.1, v0.5.1 and v0.4.4. This lesson does not bind a LeRobot version, and command names and flags may change between versions. About 80 million parameters, 50 demonstrations and a few hours for 100k steps are general statements in the documentation, not measurements by this site and not benchmarks on this dataset; “a few hours” names no GPU model.
- In the extracted page text, ${HF_USER} has spaces on both sides and –wandb.enable= is followed by a space, and in the evaluation command the comment on the –task line shares a line with –duration=60. This lesson removed those spaces from the training command and lists everything else as the page shows it. The documentation’s text says lerobot-record while its example uses lerobot-rollout; this lesson does not decide which matches the current version.
- The meanings of –output_dir, –job_name and –policy.repo_id, chunks_size referring to a grouping of data files, action being the training target, and the assumptions that one sample corresponds to one frame and that actions execute at the dataset’s frame rate are all the lesson’s inferences or assumptions; neither the documentation nor the metadata says so.
- k = 30 and the k values in the exercises, cup_pick_v1, all timings, the checkpoint interval, team W’s plan and report, and the trial and success counts are fictional, for practice only; 1.0 s, 180, 67.0 passes, 4.17 h, 33.8 min, 85%, 45% and the like hold only under these assumptions and are not the performance of any system.
- This site has not run the episode’s notebook, the training command or the evaluation command. The evaluation command drives a real robot arm; hardware safety measures are outside this lesson, and neither paper calculations nor simulation results are hardware safety validation. The dataset name contains so101 but robot_type is so100_follower, and this site has no first-hand source confirming the recording hardware, so both this page and the video say only “an SO-series arm”.
Links
- Physical AI Lab: a physical AI course where every number can be checked (course outline)
- Physical AI Lab 2.1: Building a Grasping Scene in MuJoCo — Working Out the Mass, Units, Timestep and Collision Rules the XML Leaves Unwritten
- Physical AI Lab 1.5: Where Does Data Come From? Working Out Demonstration Time from SO-101 Metadata, Then Separating the Units and Action Spaces of Three Sources
- Physical AI Lab 1.6: Imitation Learning — Working Out How an Error Rolls Out of the Demonstrations’ Coverage, Then Putting the ACT, Diffusion Policy and Data Scaling Numbers Back in Their Own Conditions
- Physical AI Lab 1.8: Evaluation — Splitting a “Net Gain of 2” into a Paired Table, Then Checking the Failure Labels and Random Seeds
- Hugging Face: meta/info.json of lerobot/svla_so101_pickplace
- LeRobot documentation: ACT (Action Chunking with Transformers)