The usual way to turn a robot simulation recording into a short explainer is to open an editor, change the speed by hand, cut between cameras and add captions. Once that is done, it is hard to say which film frame corresponds to which sample in the original recording, or whether the slow-motion section dropped or invented frames. Robot Reel’s agent director splits the job into a storyboard plan that a program can check. A user, or a language model connected over MCP, writes a brief and the shots; a validator checks that the shots cover the whole recording without gaps or overlaps; Blender then builds an editable project and renders the film. Based on docs/director.md and the example storyboard examples/contact-storyboard.json at commit c4bbdbb, this article covers the storyboard contract, how to check the frame mapping by hand, the commands from plan to film, and the permission boundary of the MCP server.
All numbers and feature descriptions come from the project’s own documentation ([O], the project’s own account). This site did not run these commands and did not re-render anything. For an overview of Robot Reel, see Robot Reel: turning robot policy simulations into frame-by-frame verifiable replays and 3D scenes; this article covers only the new director feature.
The example film: two braking trials, four shots
The director demo page linked from the documentation shows a seven-second film made from an existing pair of independent one-dimensional MuJoCo braking trials in the repository. It has four shots: overview, tracking, half-speed contact and top view. All 180 source samples are kept, laid out across 210 output frames. According to the documentation, all 420 vehicle samples, the four cuts and the tracking camera were checked in the saved Blender 5.2.1 LTS project.
Two things should be kept apart here. MuJoCo is the simulator that produced the recording; Blender only replays the saved samples. The documentation states that the director does not synthesize new physics. The course lesson Physical AI Lab 1.4: A Map of Simulators — Counting the Cost of the Timestep, Finding Where Contact Splits Two Runs, and Pinning Three Speed-ups to Their Baselines shows that recomputing with another engine can make trajectories diverge at the moment of contact. This film recomputes nothing, so the contact on screen is the contact in the recording, and the film is no more “real” than the recording itself.
The storyboard contract: a plan a program can check
A plan uses schema robot-reel-director-1 and contains a brief, a title, a theme (midnight or daylight) and 1–8 shots. Each shot has start, an exclusive end, camera, rate and caption. There are only a few rules:
- The camera must be one of
overview,tracking,impact,top. - The rate must be 1 or 0.5; at half speed each sample is duplicated exactly once.
- Shots must cover the entire source recording in order, with no gaps and no overlaps.
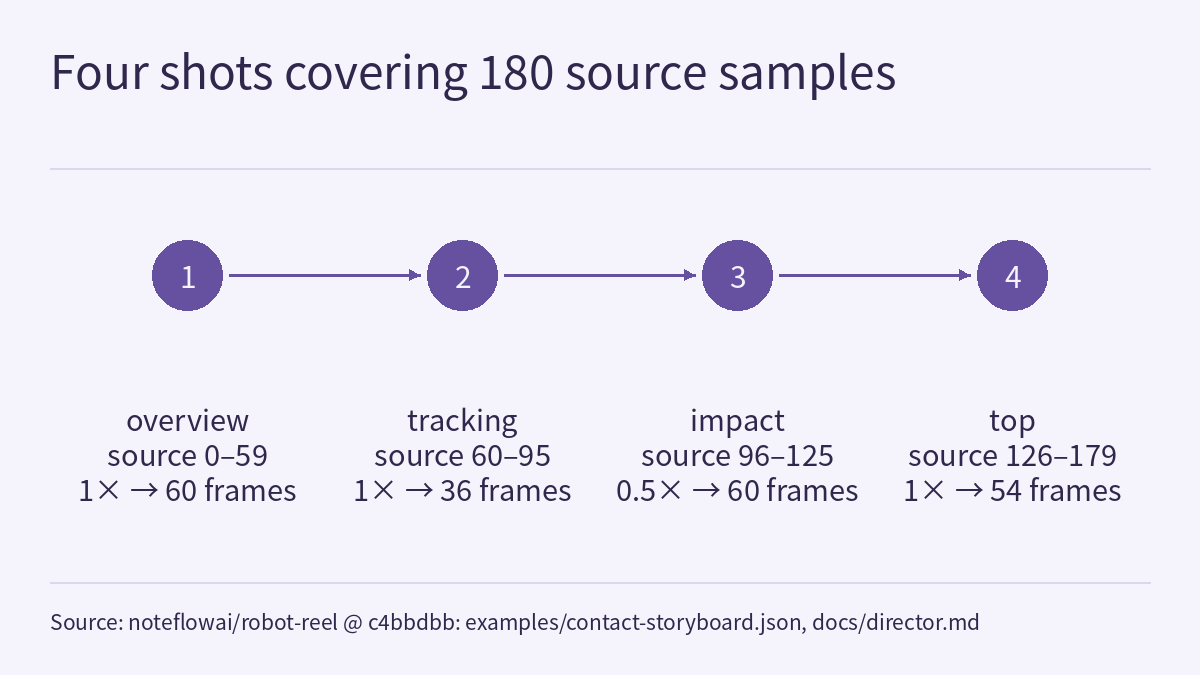
The example plan is titled “One decision. Two outcomes.”, uses the midnight theme and has four shots (captions as in the original):
| Shot | start–end | camera | rate | caption |
|---|---|---|---|---|
| 1 | 0–60 | overview | 1 | Same start. Different braking decisions. |
| 2 | 60–96 | tracking | 1 | Follow the measured approach. |
| 3 | 96–126 | impact | 0.5 | Recorded contact, slowed to half speed. |
| 4 | 126–180 | top | 1 | Two outcomes. Every source sample retained. |
Each shot’s end equals the next shot’s start, and the last shot ends at 180: that is what “no gaps or overlaps” means. The contract is narrow; a plan can only specify cut points, cameras, rates and captions. So errors that violate the contract are caught mechanically: leaving out the 126–130 stretch, or asking for 0.25× speed, simply violates the contract, and nobody has to watch the film frame by frame to notice. Whether the cuts and cameras suit the brief, however, is not checked; a contact shot placed away from the recorded contact, for example, still meets every rule.
The frame mapping, worked by hand
The generated film.json maps every output frame to its source frame and simulator timestamp. The documentation states three things: output frame indices start at zero while Blender frames start at one; film time and simulation time intentionally differ during slow motion; and the validator recomputes the mapping rather than accepting a JSON file that has been rehashed but is internally inconsistent.
Applying the rules above gives the mapping for the example (this is this article’s derivation, not a table published by the project):
- Shot 1: source samples 0–59 at 1×, output frames 0–59, 60 frames.
- Shot 2: source samples 60–95, output frames 60–95, 36 frames.
- Shot 3: 30 source samples, 96–125; at half speed each appears twice, giving output frames 96–155, 60 frames. Output frames 96 and 97 both map to source sample 96, and output frame 155 maps to source sample 125.
- Shot 4: source samples 126–179, output frames 156–209, 54 frames.
The total is 60 + 36 + 60 + 54 = 210 frames, matching the documented 210 output frames; at 30 fps that is seven seconds, matching the seven-second film. The half-speed shot takes two seconds of film time. Because Blender counts from one, source sample 96 first appears at Blender frame 97. The cover of this article reads “SOURCE 096” at the bottom left and “SHOT 3 / 0.5x” at the top right, consistent with this mapping.
The point of doing this by hand is that a reviewer does not have to trust the film: the plan and film.json are enough to match each frame to the source recording. The source traces and their checksums stay in the bundle’s source/ directory.
From plan to film
The documentation gives these build steps for the example, run from the repository root. The plan exporter and the verifier use only the Python standard library:
python3 -m robot_reel.cli direct docs/compare/braking --inspect
python3 -m robot_reel.cli direct docs/compare/braking \
  --plan examples/contact-storyboard.json --output artifacts/director
python3 -m robot_reel.cli direct artifacts/director --verify
blender --background --python artifacts/director/build_directed_scene.py -- \
  --bundle artifacts/director --output artifacts/director/reel.blend
blender --background --python scripts/check_director_blender.py -- \
  --bundle artifacts/director --blend artifacts/director/reel.blend \
  --report artifacts/director/animation-check.json
blender --background --python scripts/render_blender_preview.py -- \
  --blend artifacts/director/reel.blend --frames artifacts/director/frames \
  --scale 100 --samples 6 --threads 2
In order: inspect the recording; write a bundle from the plan; verify the bundle; build the Blender project reel.blend; run the animation check inside the project and write a report; render each frame. The documentation asks for CPU Cycles rendering; the checked example is 960×540 at 30 fps, with constant sample hold and no motion blur. The saved project contains procedural materials, the source telemetry, all camera bindings and the embedded plan and mapping JSON. Captions are burned into the MP4 during packaging and stored as timeline marker labels in the native project; they are not animated text objects.
With the normal Robot Reel runtime installed, package it as a site:
python scripts/build_director_site.py --bundle artifacts/director \
  --output artifacts/director-site
The packager requires the native check report and all rendered frames before it starts encoding. It creates the video, poster, preview, interactive page, checksums and project.zip. The default font on Linux is DejaVu Sans; on other systems pass --font PATH. Open the resulting index.html next to its media files.
Two things are missing from the documentation if you want to reproduce this. The documentation says the example project was checked in Blender 5.2.1 LTS, but the commands above do not pin the installed Blender version; and this document does not explain how to install the “normal Robot Reel runtime”. Also, the fourth command makes Blender execute the generated build_directed_scene.py from the bundle, which is code execution on your machine; this site recommends running it only on bundles you generated yourself or have reviewed.
Connecting an agent: what the MCP server does and does not do
In the normal Robot Reel environment, run pip install -e '.[director]'. The documentation says the MCP SDK is pinned to 2.1.1, compatible with the existing Strands runtime. Configure the MCP client with a local stdio server, replacing the two absolute paths with your checkout and interpreter:
{
  "mcpServers": {
    "robot-reel-director": {
      "command": "/absolute/path/robot-reel/.venv/bin/python",
      "args": ["-m", "robot_reel.cli", "mcp", "--root", "/absolute/path/robot-reel"]
    }
  }
}
The documentation’s example request is: inspect docs/compare/braking, start with both trials, follow the approach, slow down the recorded contact and finish with both outcomes; keep all source samples and write the storyboard into artifacts/my-directed-film. The connected language model interprets the brief, and the two tools have distinct jobs:
inspect_recordingreturns the actual event frames and outcome summaries in the recording; the model can choose cut points from them.create_storyboardvalidates the typed plan and writes a new bundle.
The boundary is equally explicit: the tools operate only on paths relative to the configured root, reject symlink and .. escapes, and refuse non-empty output directories; the server does not execute shell commands, arbitrary Python or Blender. The build and render commands in the previous section are explicit subsequent steps for the agent or the user. Starting the MCP server does not by itself cause any model call. The full stdio integration test is python scripts/check_director_mcp.py, which the documentation says also runs in CI.
The demo website hosts no language model; it shows a rendered example. Its editor downloads a plan for a new render; edits there do not change the film currently shown or its source metadata.
Limitations
- The director currently supports braking captures and comparisons only. It cannot direct arbitrary robots and does not synthesize new physics; Blender only replays saved samples.
- Captions are editorial language, not independently verified statements. “Different braking decisions”, for example, summarizes the two trials; the validator checks the frame mapping, not whether a caption is correct. For checking written claims against a recording, see Checking a model’s explanation against the original robot recording: what Robot Reel’s review-claims can establish.
- Checksums establish file consistency, not independent authenticity.
- The seven seconds, 210 frames, 420 vehicle samples and the Blender check results are the project’s records from its own environment; the per-shot frame numbers in the third section are this article’s derivation from the contract rules. This site has not rerun the build or render.
- The source is a one-dimensional braking simulation; the lanes, car bodies and blocks on screen are rendered 3D shapes. This is not a real vehicle test and not a hardware safety validation.
Links
- docs/director.md: agent director documentation (commit c4bbdbb)
- examples/contact-storyboard.json: example storyboard plan
- Director demo page
- Original cover image: docs/director/poster.png
- LICENSE (Apache-2.0)
- Robot Reel: turning robot policy simulations into frame-by-frame verifiable replays and 3D scenes
- Checking a model’s explanation against the original robot recording: what Robot Reel’s review-claims can establish
- Physical AI Lab 1.4: A Map of Simulators — Counting the Cost of the Timestep, Finding Where Contact Splits Two Runs, and Pinning Three Speed-ups to Their Baselines
- Physical AI Lab: a physical AI course where every number can be checked (course outline)